The thermal scope is one of the most significant optical devices for night hunting. Whether the weather is foggy or dusty, day or night, a thermal rifle scope provides flexibility in all seasons and weather conditions.
Selecting a thermal scope can always be difficult, especially for a beginner making his first choice for either hunting or military operations.
More and more brands are coming to the market, from expensive military models to cheaper, commercially-available scopes. The military-grade thermal scopes are designed for rough combat conditions compared to the more accessible models, while the latter is always easier on your wallet. Before you get down to selecting the best thermal scope, read below for the most comprehensive guide to help you find the proper thermal scope.
At the end of this article, we also make everything easier by identifying the exact actions you could do before making your decision.
1. Applications
Is it for hunting, law enforcement, or something else? Identifying your specific applications for the thermal scope is the first thing you must do before making any decisions. Below are the main factors that apply to a hunting and military/law enforcement model you will need to consider.
| Hunting/Civilian | Law enforcement/Military | |
|---|---|---|
| Endurability/Recoil Grade | Low | High |
| Lifespan | Medium to Low | High |
| Ruggedized | No | Yes |
| For bad weather conditions | No | Yes |
| Weight | Depends on internal components | Depends on internal components |
| Software | Fancy and functional | Functional and Easy-to-use |
| Price | Low | High |
As you can see from the above, a military standard thermal scope wins for almost all aspects, but loses out when it comes to its price, which can be double or nearly triple the price of the hunting/civilian models.
However, using a commercially-available model will be sufficient for everyday hunting. But for hunters with high recoil rifles or living in harsh weather conditions such as extremely low or high outdoor temperature, a military-standard scope should also be considered, as most civilian/commercial models cannot function under -20°C. On the other hand, military and law enforcement applications need a ruggedized model that could be used in all weather conditions.
Moreover, the model needs to be capable of working as fast-react, easy-to-use, and with a long battery life that can sustain itself overnight.
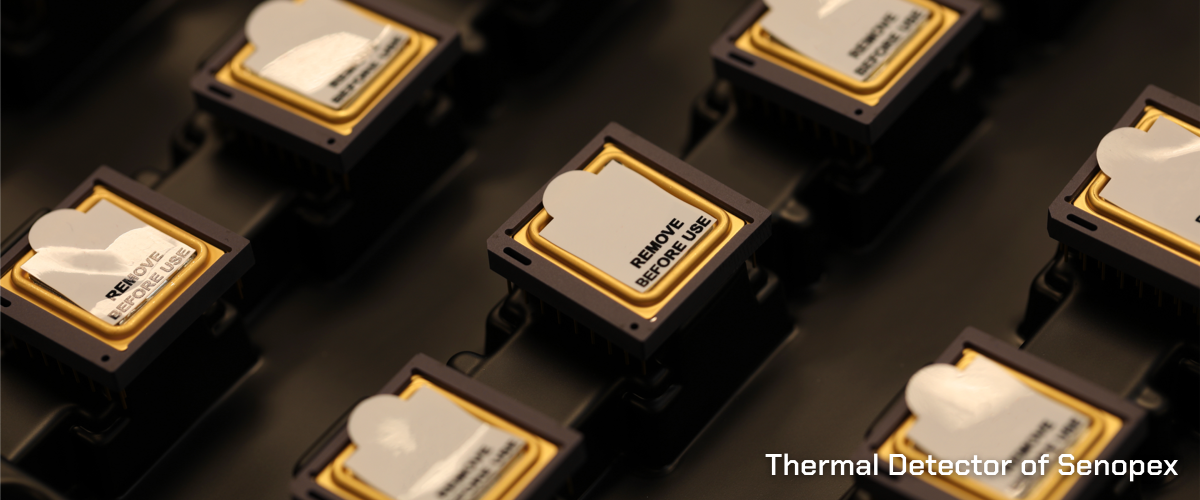
2. Thermal Detector
Before purchasing a thermal scope, the thermal detector is one of the most critical parameters everyone talks about. The quality varies, and the thermal detector’s performance is crucial to delivering a top-quality thermal image.
2.1 Resolution
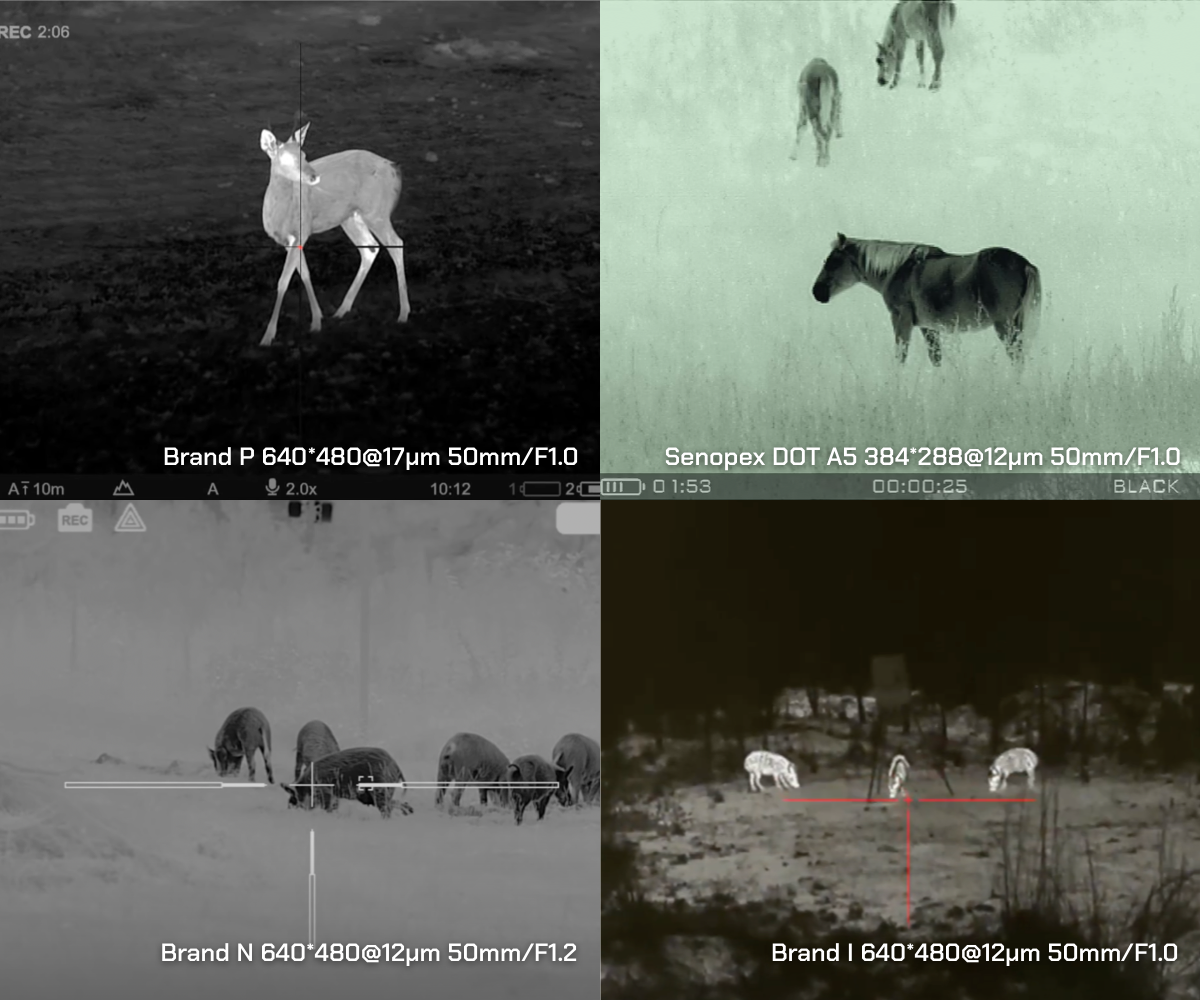
Thermal detector resolution is the first thing for evaluating the actual quality. The higher resolution delivers sharper imagery without a ‘pixelated’ display on the targets. A scope with a 640*480 resolution thermal detector will have better overall image quality than the 384*288 resolution model, simply because more resolution is applied to enhance the image performance.
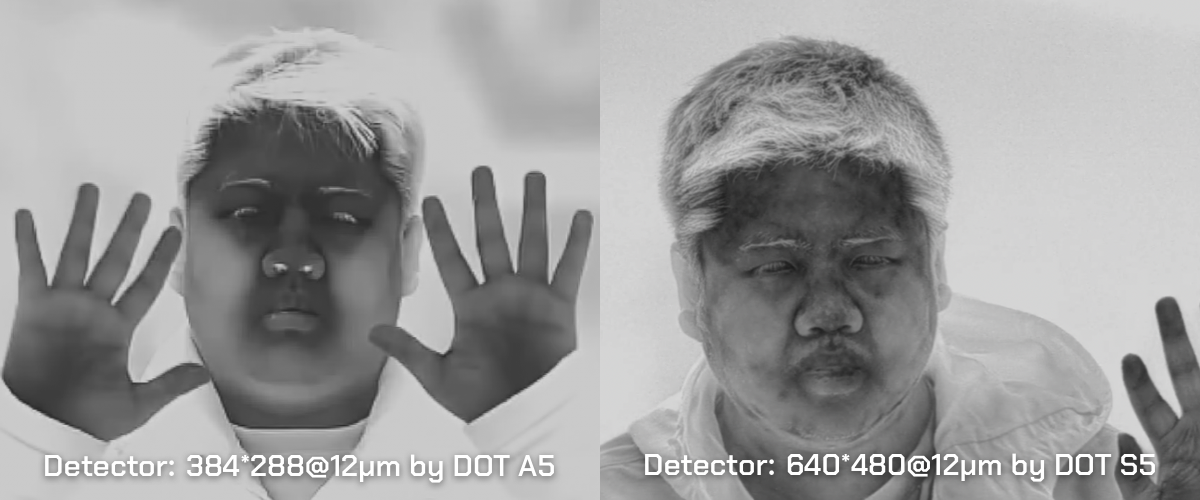
On the other hand, a higher resolution thermal detector typically has smaller FOV and magnification with the same size of lens. For example, for two 12-micron thermal scopes, both in 75mm lens but with 384*288 and 640*480 resolution, the magnification level is 7x and 4x, respectively. As you can see, there’s a big difference in the mag level only, due to the resolution being changed.
A higher resolution thermal detector offers sharper imagery, and the quality is also significantly reflected in the price. Typically, a 640*480 resolution unit is priced $1000-$2000 higher than a 384*288 unit, depending on the lens’s size.
2.2 NETD
NETD indicates the ability of the thermal detector to recognise the smallest temperature difference of your target.
The smaller the NETD is, the more sensitivity you will get. It is crucial to consider the quality of thermal detectors, as many have the exact resolution but are different in NETD.
The lens aperture of the thermal scope influences the NETD at the square root of its value. The F-stop corresponds to the amount of light collected by the lens. It is defined as an F-number—from 0.8 to 1.6 for most thermal scopes in thermal imaging. For a detector alone, the NETD is generally given for F/1.0. For modules or cameras, the NETD depends heavily on the F-number. It is related to the thermal detector NETD as follows: Overall NETD = NETD of Detector x F².
For example, for an original thermal detector with a NETD of < 40mK @F/1.0, the NETD is 57.6mk @ F/1.2 and 25.6mK @ F/0.8. Thus, especially for a beginner seeking a thermal scope in the market, you need to be cautious with the manufacturer who claims their scope’s NETD is equal to <40mk but with F1.2 or F1.1 aperture on their lens system.
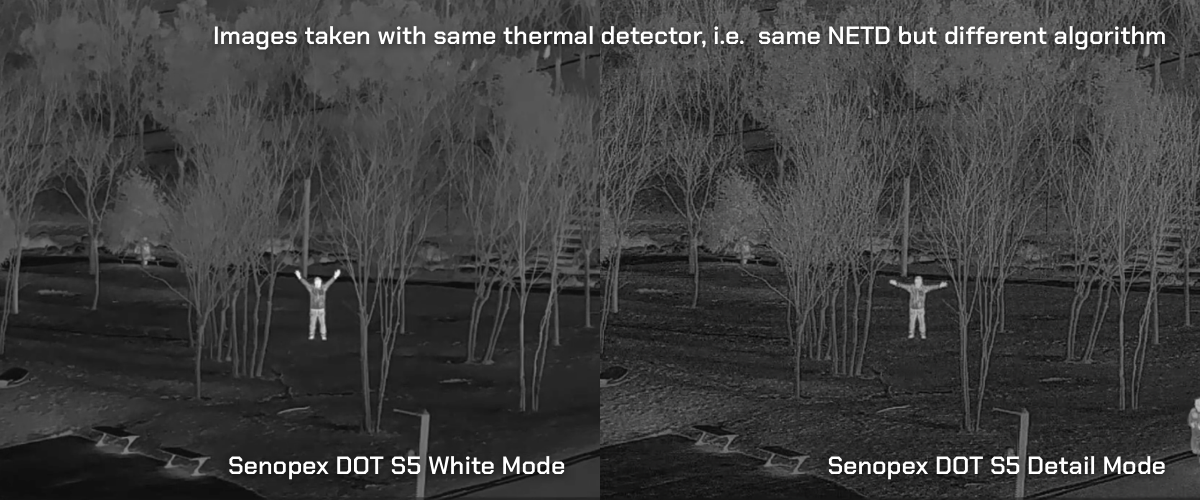
Many companies start to claim their NETD to be as low as whatever they want to put on the specs sheet. Some even write 15mk or 20mk for their uncooled thermal scope, which means it has even better performance than a cooled thermal imager. Please bear in mind the NETD numbers won’t tell you the whole story. In fact, the image quality you could see from the scope mostly depends on the thermal algorithm the developer implements. For example, the NETD performance of the thermal detector is just like the food materials or ingredients. You want it as fresh as possible for sure, but it is how you cook, and your cooking skills decide how well the dishes taste. But in most cases, a 3-star Michelin restaurant chef can always cook better food than the chef in a random corner restaurant with the same ingredients.
2.3 Refresh rate
The refresh rate indicates the number of times per second that the frame of an image is refreshed. It is expressed in Hertz (Hz) or frames per second (fps). A higher refresh rate provides dynamic movements of your targets, without ‘dragging’.
A good quality thermal scope provides at least 50hz to ensure the best picture of targets in the move. Given that most of the market manufacturers now offer a 50hz refresh rate, the older generation thermal, with 9hz or 30hz, is out of the competition.
3. Image Quality & Algorithm
The thermal algorithm always plays a vital role in delivering the overall thermal image quality. You can easily compare the hardware specs of each manufacturer, but it is always hard to define the image quality of a thermal scope. So here is the question: what exactly do we mean when we talk about thermal image quality? Below are four main ‘parameters’ that draw a general picture of how we describe thermal image quality.
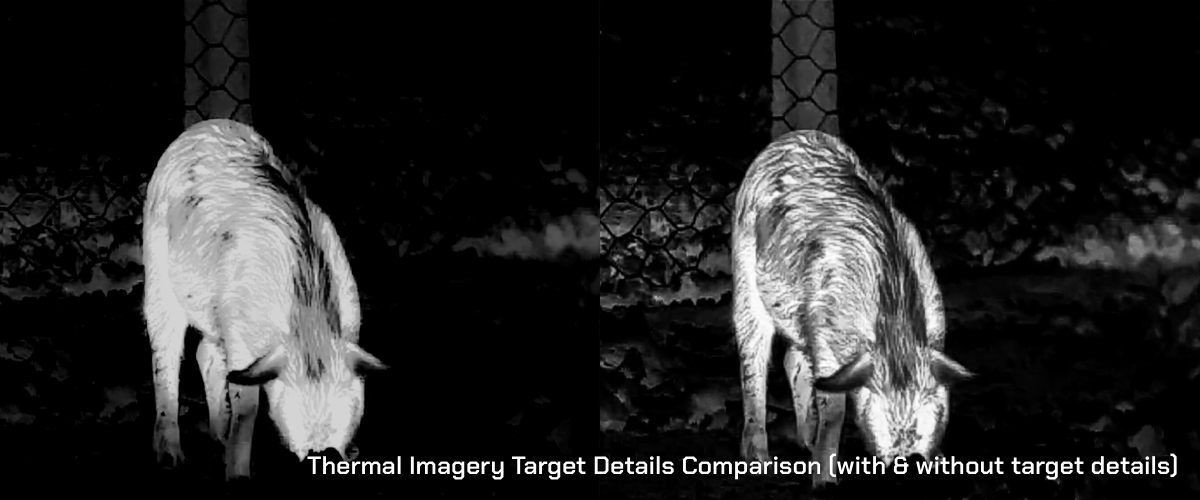
3.1 Target details
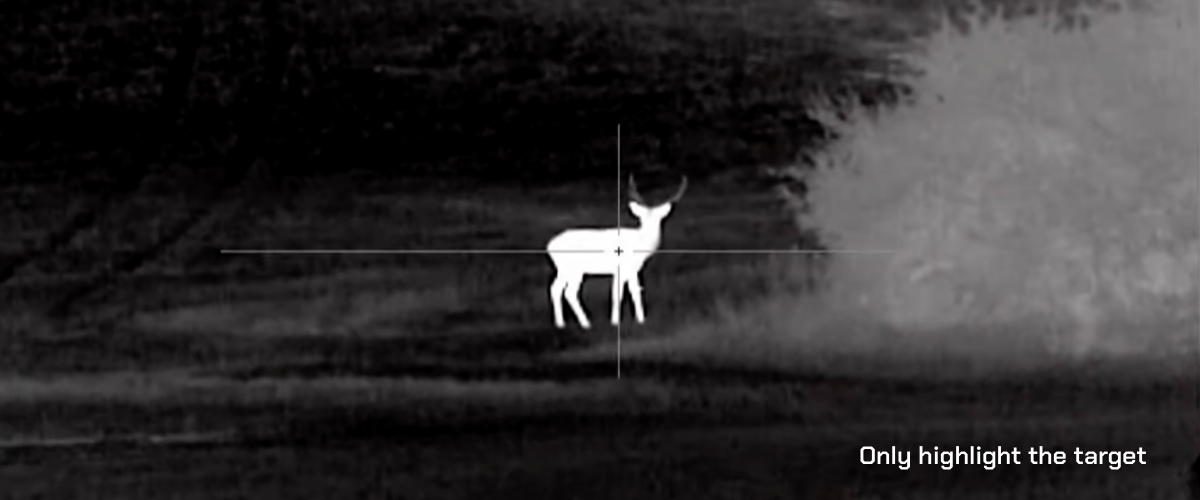
Target details mean what you expect to see on the main target within your field of view. The more information/colour temperature you can achieve indicates its overall performance on ‘target details.’ It is hard to achieve a great level of target details as it requires a higher standard thermal detector with an advanced algorithm. Here are some questions you should ask yourself before deciding just how good the ‘target details’ are:
• When you detect animals or humans, can you see them only in highlight, like a bright and over-exposed object?
• Can you see their mouth, nose, and eyes clearly displayed?
• Can you see the animal’s fur in short, medium, and long-range?
• Are the animals’ bodies displayed with different colours, or can you only see a block/lump of white/black objects with the same temperature?
Good ‘target details’ enable you to see as many details as you wish. An imager of lesser quality can only display the targets in highlight, which any manufacturer can do.
If you are not only shoot within 50 meters, you will need to see the target details as much as possible, as sometimes you need to identify the type of the animal before pulling the trigger. A good ‘target details’ algorithm helps you identify animals’ body features from all distances, which means you are free to take shots in confidence at any time.
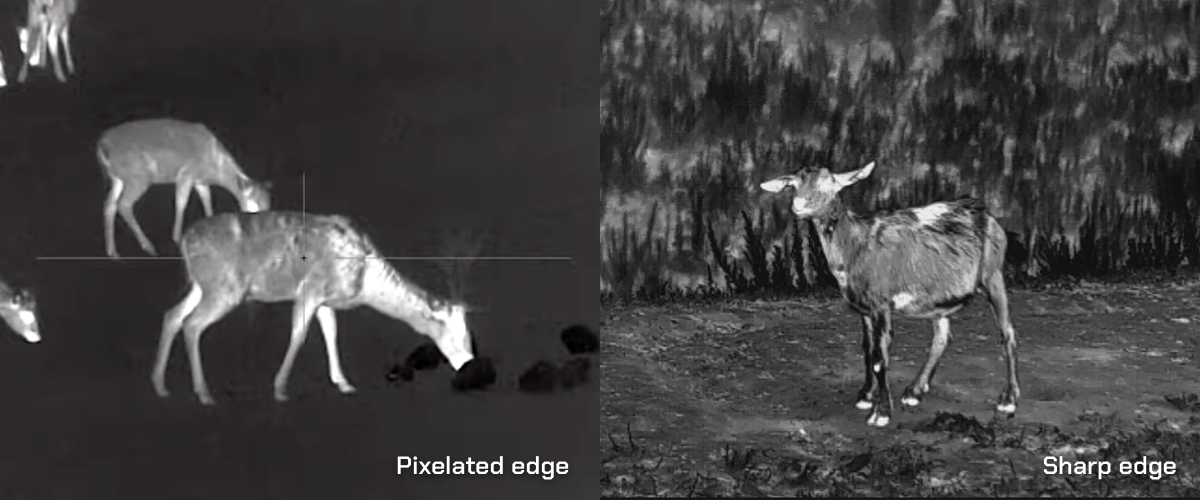
3.2 Target ‘edge’
This is the term used to indicate how ‘smooth’ the edge of your target is and if the image is ‘pixelated.’ The ‘target edge’ is primarily smooth and sharper with higher thermal detector resolution, but sometimes also achievable through an excellent thermal algorithm.
3.3 Noise
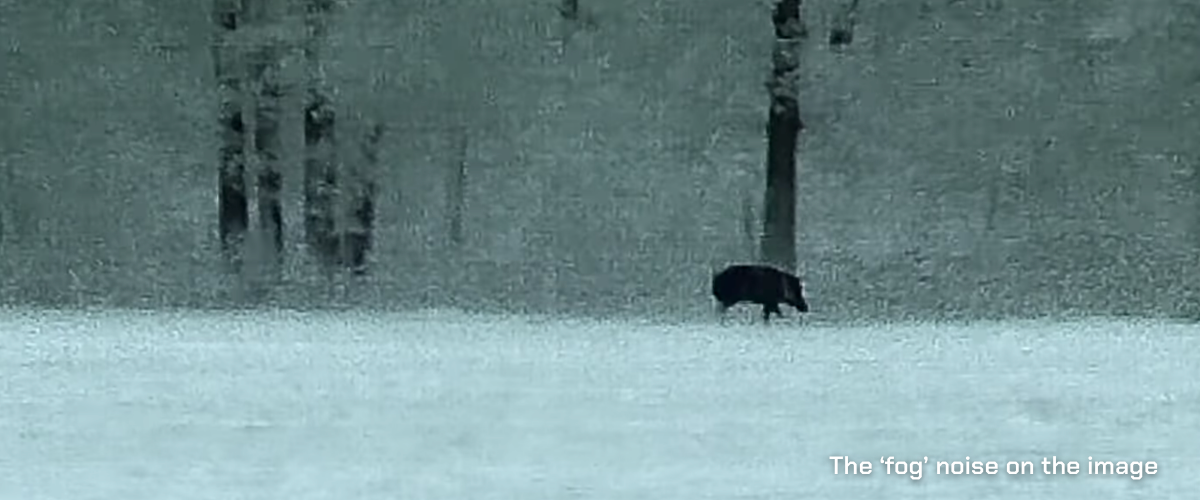
The noise within the field view is referred to as ‘snowflakes.’ Original imagery captured was full of noise. The algorithm reduces the noise level and offers a clear image. Some scopes have lesser quality detectors and are unable to use the proper algorithm to remove the noise 100%, clouding the screen with a layer of ‘fog’ on the image which you always want to blow away.
3.4 Background details
The background details indicate how clear the image around your targets is. Are the grass, trees, and mountains behind the animal clear enough? ‘Background details’ is a reference parameter to help distinguish between details of the environment, while observing your targets.

4. Magnification & FOV
Magnification level and FOV cannot be discussed separately for a thermal scope. Some users love low magnification as they want a wider field of view. Some need a high magnification scope as they wish to shoot long range.
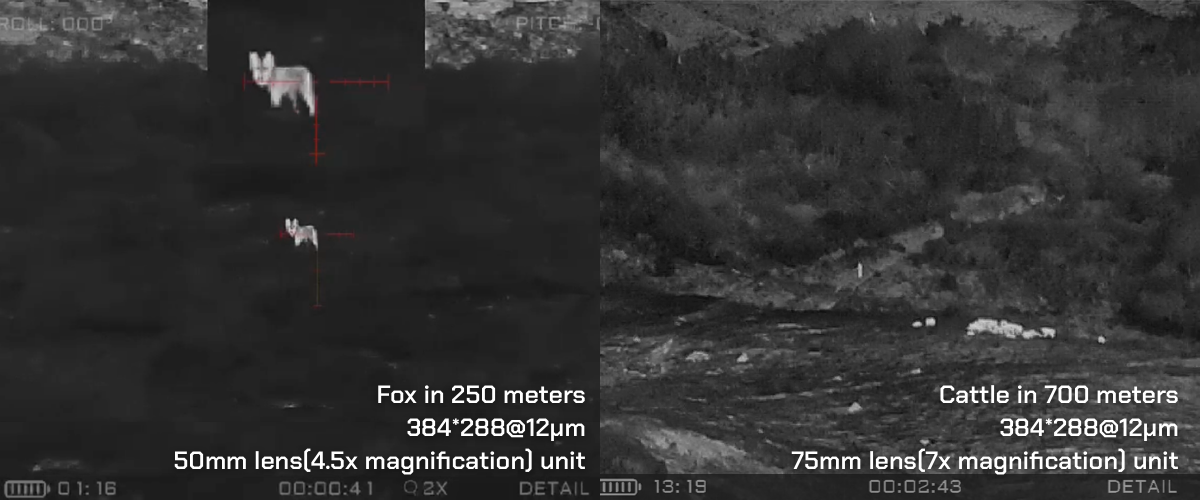
The magnification level is decided on the parameters and mainly include focal length of the objective lens and eyepiece, detector pixel pitch, and size of the display screen. Technology-wise, it is easy to achieve a high base magnification level for manufacturers, but why are their thermal scopes mostly at a relatively lower level?
The most important reason is that a higher magnification may reduce the image’s resolution, which means the thermal image quality cannot be maintained at the highest standard with a higher base magnification. It is then very common to see an expensive 640*480 resolution thermal scope with 50mm lens, which comes with a great image quality, but you can hardly shoot slightly longer distance for even over 150 meters as it only has 2x magnification. This is just because the magnification is too low, and at a distance over 150 meters, you cannot say if your target is a hare or a fox.
However, we are not drawing a conclusion as to whether a higher- or lower-base magnification is 100% good or not. The most important thing is to find your ideal scope with the right magnification for your own shooting preference, instead of falling into the fallacy that some manufacturers are telling you a low magnification is definitely something you should go with.
5. Detection Range
Detection range is one of the most controversial thermal scope topics. You can see that every manufacturer can quickly write a relatively high detection range on their specs sheet. But it is still confusing when a beginner asks, ‘Can I see that far?’ and is often disappointed with the actual performance, compared to what they can read in the marketing materials. To clarify this, we will need to start with the definition of ‘detection range’ itself.
Most of the ‘detection range’ figure is evaluated based on the concept of DRI, i.e., Johnson’s criteria, which developed in the 1950s to define the performance of a thermal camera used for military applications. DRI is a military approach and is rarely reflected in real-world conditions. However, most end-users expect more detail/pixels than the actual DRI rating on their targets. They can, therefore, quickly get disappointed.
“D” represents Detection. According to Johnson’s criteria, ‘detect’ means ‘seeing if an object is present or not.’ Precisely, it will be visible on at least two pixels, so there will not be a lack of information to distinguish what the target is at this distance. All you know is that something is there. If you use such a parameter to confirm how far you can see through your thermal scope, you will get disappointed every single time.
“R” represents Recognition. ‘Recognition’ is defined as ‘being able to see what type of object it is.’ Recognition refers to the distance you can determine an object’s class (human, animal, or vehicle). The recognition range is typically 1/3 of the detection range. The definition of ‘recognition’ in DRI is closest to the idea of what most people understand about the actual ‘detection range’ in their mind concerning ‘How far can I see through a thermal scope?’.
“I” represents Identification. Identification refers to the distance at which you can differentiate between objects within a class, for example, identifying the type of vehicle (truck, SUV, or car) or whether the human is a soldier or civilian. ‘How far can I shoot with the thermal scope?’ The identification range is the closest parameter to what people understand about ‘shooting range’, given it offers you the minimal ‘information’ of the targets to shoot at. The identification is around 1/3 of the recognition range and 1/6 of the detection range.
For beginners who are new to the thermal world, please be cautious with the detection range on the manufacturer’s specification sheet and check out what size target is specified. In most cases, if nothing has been specified, the range is referred to as human-size targets at around 1.8m*0.5m, which you could never use to estimate your shooting range for hunting.
For example, if one claimed the detection range of a 17-micron 50mm thermal lens scope with 384*288 resolution is 1800 metres, the estimated ‘shooting range’ is within 300 metres for a man-size target. However, given that you are hunting animals with sizes mostly smaller than 1.7m in height, you need to consider your target size and the corresponding shooting range. Let’s see if you are aiming at a fox whose average size is about 1/3 of man-size; the estimated shooting range should be approximately 100 metres. So 100 metres should be your frame of reference rather than 1800 metres detection range.
Also, all these DRI distance measurements are based on a 50% probability and do not allow for changing atmospheric conditions. The actual weather in real life is rarely ideal, so these distances are almost always shorter than specified. Thus, if you are in an area with high humidity, such as the UK, the actual shooting range for foxing in the fields should be further deducted to be under 100 metres for a model with a 384*288 detector (17-micron) and 50mm lens.
6. Software Performance
The software performance is usually defined as how smoothly the function of the thermal scope performs. Many thermal scopes are criticised by end-users because their software is not user-friendly, or lags during panning.
Below are some questions you may ask yourself or the manufacturers to clarify if the software performs:
• Can you easily adjust the brightness, contrast, and image gain?
• Is the thermal scope easy to ‘zero’?
• Are those menu functions easy to use?
• Does the scope lag while panning?
• Does the scope boot in seconds?
• Any ‘POI’ shift after several shots?
7. Endurability & Protection
Endurability is mainly concerned with the recoil rate of the device. Most models in the market claim to be 9000J rated, which covers most rifles for hunting. However, for .50 caliber and above, a military standard thermal is needed to endure heavier recoil energy.
Military and law enforcement applications require a higher standard rating mostly close to or equivalent to MIL-STD-810, which is involved with tests as below:
• Operating tests at minimum and maximum operating temperatures
• Storage tests at minimum and maximum storage temperatures
• Sand and dust
• Vibration test
• Drop test
• Humidity test
• Shock test
• Gunfire test.
The MIL-STD-810 is the most demanding test system for thermal scope, and only the top-rated model can pass. A typical MIL-STD-810 qualified model is extremely endurable, has a lifespan of more than 10 years, and always maintains its highest quality, even in the worst weather conditions. However, most of these types of thermal scopes are extremely expensive and beyond the means of the civilian market.
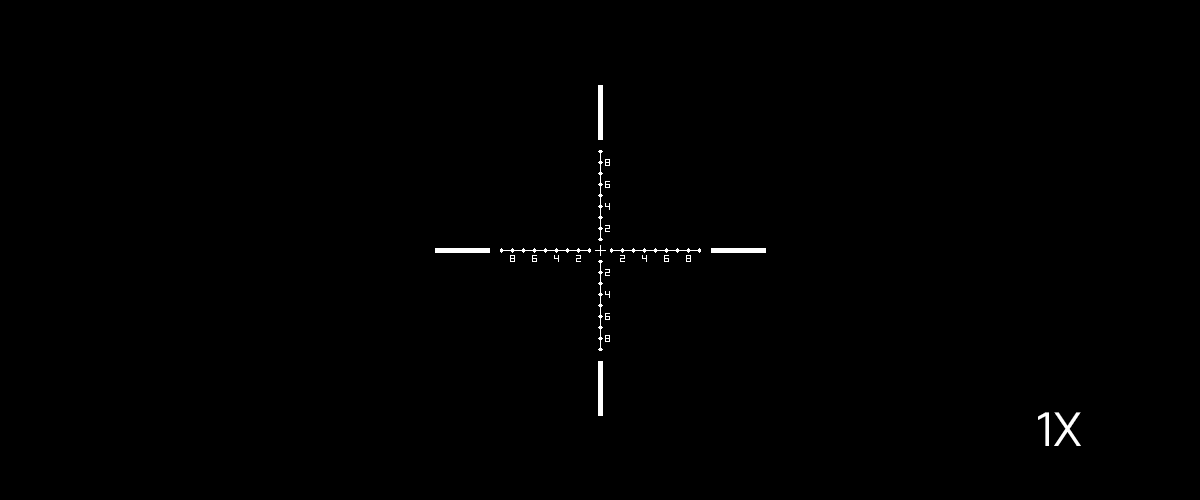
8. Reticle
It is essential to have the right reticles of multiple options for a thermal scope. Typically, a manufacturer offers at least 6 types of reticles to fit the majority of applications. Reticles can be a big topic to discuss, but this article will cover the main aspects of a thermal scope. Below are the bullet points you will need to consider:
• The first question is simple: Does the scope has your ideal reticle covered?
• Does it have a true mil-dot or MOA reticle?
• Is the mil-dot or MOA reticle scalable as the FFP style?
• Does it have an easy-to-use zeroing experience?
• Does the scope ‘hold the zero’?
All in all, it will be best to have enough options of reticles that cover both long-range and short-range. Also, according to the feedback from hundreds of end-users, scalable reticles are strongly favorable. Using an FFP-style day scope makes shooting a thermal scope much easier.
9. Battery
A good quality thermal scope also comes with good quality batteries that last for at least 7 hours after a single charge. An authentic military-grade unit needs 10+ battery life to use for the whole night. You don’t want to be bothered with a battery charger or power bank when dealing with harsh environmental conditions.
Some manufacturers produce their own batteries, which you can only buy from them if you need an additional battery pack.
According to the survey we did with more than 200 hundred thermal scope users, 82% like to have 18650-type batteries as they have longer battery life than the CR123, and are easy to buy everywhere. CR123 batteries are criticised a lot because their quality and battery life is poor.
Do your own test on the battery life if you can. Turn on the device and play around with it, checking if the battery life is all they have claimed on the specs sheet.
Conclusion
Final question. At the end of the day, how should you choose a thermal scope after reading such a long article? To make things even easier, please ask yourself these questions before shopping:
1. What are the applications of your thermal scope? Is it for hunting, law enforcement, or anything else? Will you use it only as a scope or sometimes need it as a monocular?
a. Choose commonly-seen commercial brands you can see in the market for hunting purposes if you don’t have harsh requirements on recoil, weather conditions, etc. Take a look at Senopex dual-use thermal scope models if you are looking for something with military standard but commercially-available price.
b. Choose a smaller lens if you want to use it as both scope and monocular. Let’s say the ideal lens size could be something around 35mm.
c. Choose at least 50mm lens for shooting above 100 metres. A 75mm lens will cover your range from medium to long-range with a better aiming experience, as they offer high magnification.
d. Choose a 12-micron thermal scope if you are tight with budget, but still wish to shoot a slightly longer distance. The magnification of a 12-micron 35mm lens model is almost the same as a 17-micron model with 50mm lens. Same for the detection range.
2. Shooting distance. Are you trying to shoot long range or only covering something below 100 metres?
a. Shooting a short distance needs a smaller lens size. You don’t need anything above the 35mm lens model if your range is below 100 metres. Why not a 19mm or 25mm lens? Because the magnification level could be really low and will make it challenging to shoot accurately, even under 100 metres.
b. ‘I shot 100 metres and above. Can I use 50mm and 75mm lens models?’
Again, the only thing you will need to consider with a larger lens is the FOV. While offering a higher magnification, narrower FOV makes it harder to scan the animals.
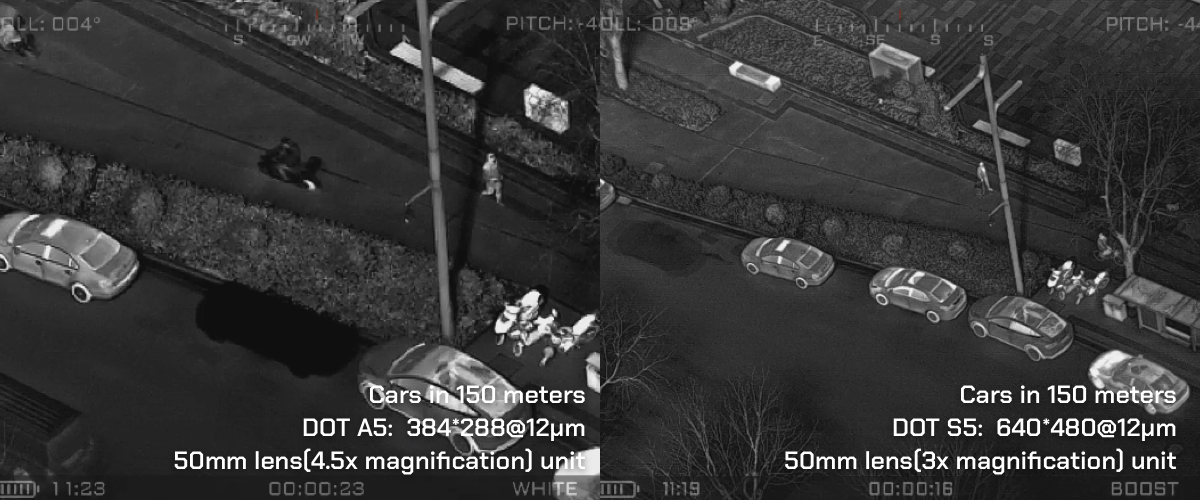
However, a larger lens size comes with a higher magnification level, which makes your shooting experience extremely comfortable, especially when you’re going to shoot small-size animals. See below for a quick comparison between the image from a 35mm lens and a 75mm lens model at 150 metres. Which one makes your shot easier?
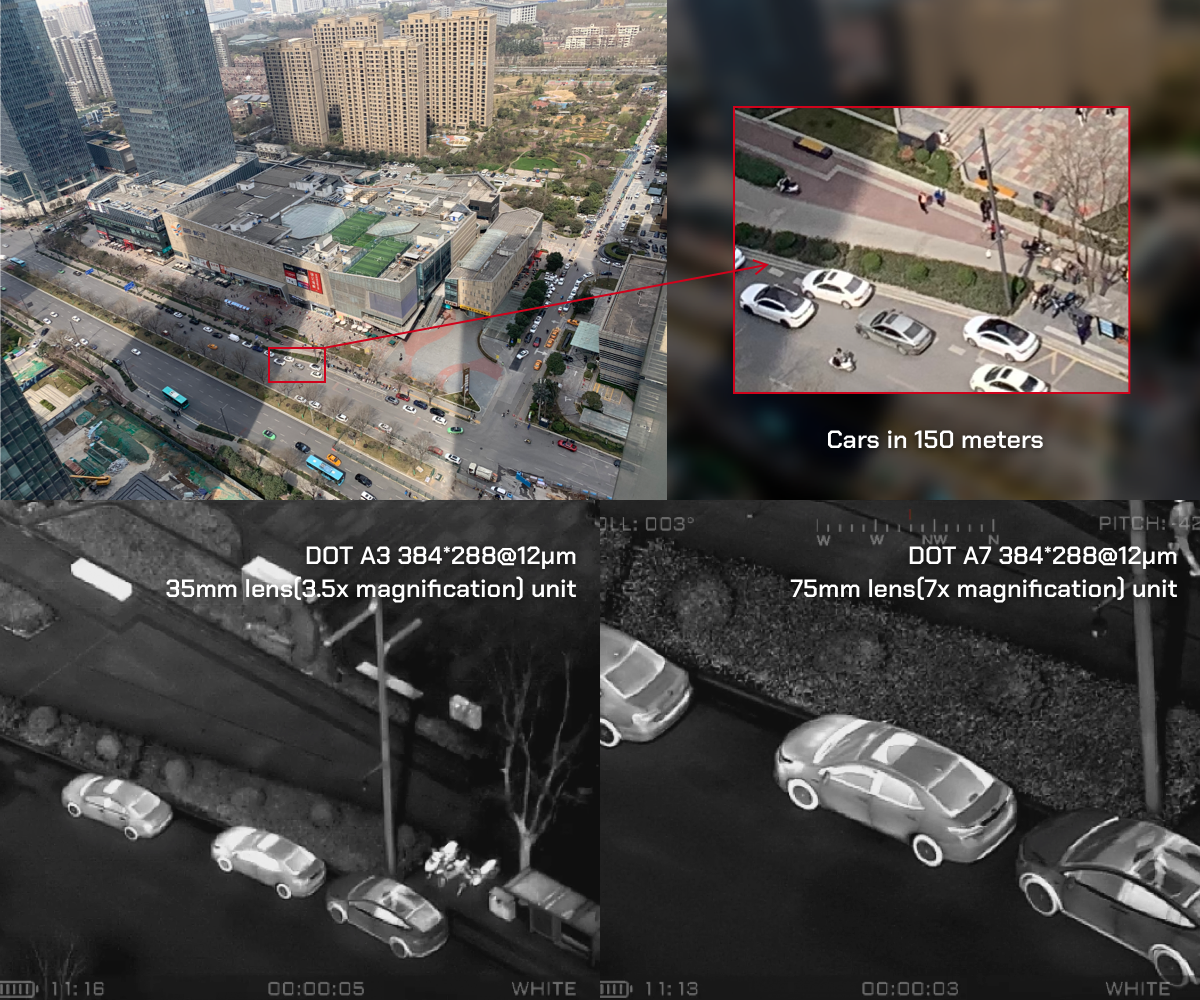
3. Resolution: 384*288 or 640*480?
a. Everyone could suggest you go for a 640*480 model if your budget allows. Is it always right to chase for the 640*480?
A 640*480 resolution model can definitely boost the image quality, but it brings a lower magnification level with the same lens size. For example, most thermal scopes in the market provide 3.5x magnification for their 384*288 model, and it will be only 2x when the thermal resolution reaches 640*480. Below is a comparison between a 384*288 and 640*480 model with a 50mm lens, taking a cars’ image in 150 meters as an example.
Senopex is now the only manufacturer globally that made the breakthrough to introduce its higher-than-market base optical magnification thermal scope. The DOT A series thermal scope (384*288 @12 micron) offers top-notch details on targets without compromising anything on its image quality. ‘The long-range shooter’s dream’ is what the customers say.
4. Price.
Hate to say, but it’s always essential to mention in the end. Setting up a budget and buying the best model within the budget range is always the wisest thing before shopping for your scopes. Many thermal scopes brands are emerging, and there is a huge selection of models for hunting, law enforcement, and military applications.
a. Depending on the brand names, a typical commercially-available thermal scope (non-LRF version) with 384*288 core is priced between $2500 –$4000, and 640*480 resolution scopes are mostly selling at the range of $4300–$6000, with different sizes of lenses.
b. Try to buy the largest lens size within your budget for a better shooting experience, after considering magnification and FOV.
c. Think twice about buying a model that’s out of your price range (as mentioned above) and be just as cautious about buying one at an extremely low price.
5. Check the unit in person.
If you possibly can, check the thermal scope physically, in front of your own eyes, rather than depending on reading about their specs and watching videos online. No one else can tell you how good the image quality is until you see it yourself. Below are a few things you will need to check or test a unit.
a. Feel and check the image quality with the above parameters, i.e., target details, target edge, noise, and background details. Check the performance under different weather conditions, during both day and night. Try to see and detect different targets at short, medium, and long-range. If you can compare with any other units, do so, and keep making the comparisons all the time.
b. Try the software and the menus, and get a feel of the overall experience. Check if the unit boots up in seconds and is easy to understand, and has useful features. Check out also if there is ‘lagging’ when panning the scope.
c. Mount it on your rifle, and check if the eye relief is comfortable. Now try to zero the scope. Test and feel the general zeroing experience: is it easy to use, fast and handy? Check the built-in reticles: is there is a crosshair that fits your shooting habit? Are the reticles scalable?
d. Check out the battery life. Does the scope sustain your whole journey? How much battery has it lost? Do you need an additional battery pack for your next hunting game?
e. Add-ons. Does the scope come up with good-quality accessories? A good accessory set shows the manufacturer’s attitude. Even the quality of their user manual and cables matter, as these details show how the brand treats their customers.
Table of contents
Share:
Related Posts

The Ultimate Guide to Choosing a Thermal Scope (2022)
The thermal scope is one of the most significant optical devices for night hunting. Whether the weather is foggy or dusty, day or
Beginner’s Guide: How far can you shoot with a thermal scope?
How far can I shoot with a thermal scope? The question is always asked despite the fact that most thermal scope manufacturers have listed the
Why is a Thermal Device So Expensive?
The discovery of ‘infrared rays’ dates to the beginning of the 19th century by Sir William Herschel, He concluded through experiments that there is an